
Setting up and using Editor42
Editor42, most often referred to as ED42, is a map editor for the Battlefield 1942 game series (including Battlefield Vietnam), created by Frederick "Coincoin" Taillon back in the very early days of Battlefield 1942 modding, and was in widespread use long before the first versions of the Battlecraft editor were released by EA Dice. ED42 is a "must have" tool if your goal is to create visually realistic, multi gamemode (including AI), and professional looking maps, and you need to learn to use it in conjunction with the Barrlecraft editor to achive this goal. Put another way, you not only need to learn to use both editors, but to be able to switch seamlessly between the two while keeping your project(s) syncronized. The editor when extracted has a readme file with directions on its setup, but they are a bit vague and confusing to someone whithout some basic programing knowledge. For that reason, this tutorial is not only meant to supplement the supplied instructions, but also to provide more detailed and advanced instruction instruction on its use. Editor42, like Battlecraft 1942, is a standalone map editor, but unlike Battlecraft, it does not work with the compressed .rfa archives, and therefore a mods objects, standardmesh, textures, and map archives need to be extracted into a "working folder (directory)" in order for it to work. This is also the reason "MadBulls Heightmap Editor" was chosen over Editor42 as the model for the Battlecraft editors by EA-Dice, that and connections that MadBull and Zerk had with EA insiders at the time (Rex). Once you learn to use ED42 (and also use BC)you will find that it has some really intutive features that set it above Battlecraft in many areas, but it's when you use both you wish that someone with commin sense had combined the two into one when creating the Battlecraft editors, and why I say it takes the combination of both to create a really great map. At some point I am hoping both this and my Battlecraft tutorials begain to merge into one.
Skill Level:
- Advanced Beginner
Prerequisites
- Good overall Knowledge of Battlefield mapping.
- Good working knowledge of Battlefield 1942 and Battlefield Vietnam files structures.
- Oveall Basic Mapping Skills, and fully understand map structure.
- Know how to use WinRFA, and if not I have a tutorial Here.
- Excelent computer skills (sounds silly, but you would be supprised at how many can't copy, paste, or create new directories).
Tools Required:
- You will of course need Editor42, and to make sure you have a good working copy of v.041, please download it Here.
- WinRFA from the Mod Development Tool Kit v.2.75. If you don't have it yet you can download that latest version Here.
- Notepad
Getting Started.
Installing Editor42
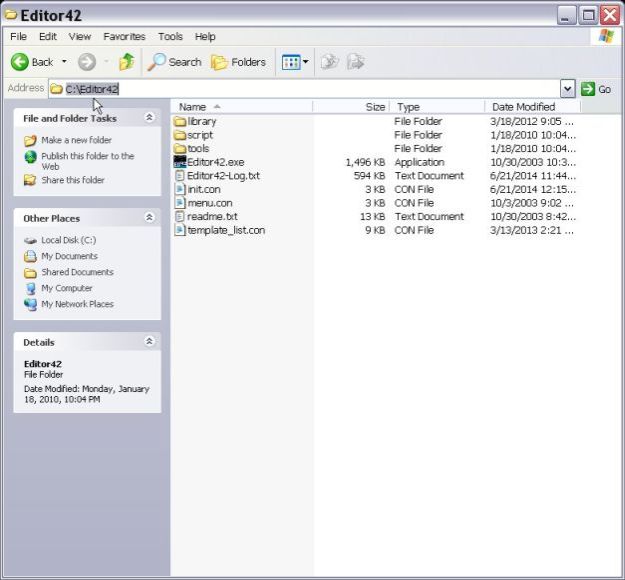
Editor42 does not install into Windows like a regular program, rather you just extract it into a directory (folder) you create. Now as to where you extract it is up to you, but I strongly suggest you install it on the drives root directory, for example, "C:\" is the root directory of drive C. I have mine on my C drive like so "C:\Editor42." You can see what it looks like when opened in the image below. DO NOT RUN Editor42.exe YET! You first have to make a dev folder for each mod you are going to work with, and the instructions for doing this are coming up next. Later I will go over the inner workings of ED42, and show you some settings you are going to want to adjust in the the int.con file, but for now lets get it running because you will better understand why your making those changes.
The Dev Folder:
Now as I mentioned, ED42 does not read the compressed "*.rfa" game and map files like Battlecraft, so you have to have an extracted copy for it to work with, and this is where the dev folder comes into play. Now again you really need to create your dev folder on the root of whichever drive you use, and I strongly suggest you a seperate drive. I use my I drive for my ED42 dev folders, and my working folders (another tutorial). I like using a seperate drive for several reasons including, but not limited to, the following. One, if some reason my windows install goes south, or the drive crashes, I have all my stuff on another drive. Second, by the time you extract several mods, and their many maps, your taking up a lot of space that can fill up your C drive reather quickly if your not careful, and third will come into play later when you have to use command line tools, and batch file, and this is especially true if you going to texture, or edit and create pathmaps using ED42. I assure you one thing, you will be glad you followed my advice down the road.
Ok, make your dev folder, and I suggest you make it short, leave out any spaces, or replace them with an underline character "_" instead. You don't have to, but for reasons mentioned above you will be glad you did. Nothing like dealing with long directory paths, and file names when working from the command line. Now ED42 only uses the three main archives, and they are as follows.
- Objects
- StandardMesh
- Textures
Now of course these archives are located in your EA GAMES\Battlefield 1942\Mods\bf1942\Archives directory, so what youre going to do, using WinRFA, is to extract each of these archives, one at a time, into your newly created dev folder. The Objects.rfa is straight forward since there is only one, but both standardMesh and texture have a "_001" extension, or update add-on archive files as they are referred to, and need to be extracted in sequence. For example, you first extract the standardMesh.rfa, then the standardMesh_001.rfa, and overwrite when asked. You do the same to the texture archives. Next your going to extract all the maps, or at least the ones you want to work with, in the same way. Anyhow, below you will see a series if thumbnails, and if you start with the first one on the left, or number one, it opens all of the images up in a lightbox slideshow showing the whole process in sequence, along with descriptions of what is happening in each. You navigate with the "next" - "prev" links (or N - P keys), and use the close link (or X key) on the bottom right to close the lightbox.


Running Editor42 for the First time
Now that we have our dev folder setup it's time to fire up ED42 for the first time. On a first time startup you will get the directory interface like mine below, except it will have "!prompt" in the "Base Directory" field instead of "I:\bfdev" like mine below, which has already been setup. You need to click the browse button then navagate to where you created you dev folder to where it shows up in this field like mine below. DO NOT CHANGE ANY of the other fields, unless you know exactly what you are doing! It is all setup to work right if you installed everything like I explained above.
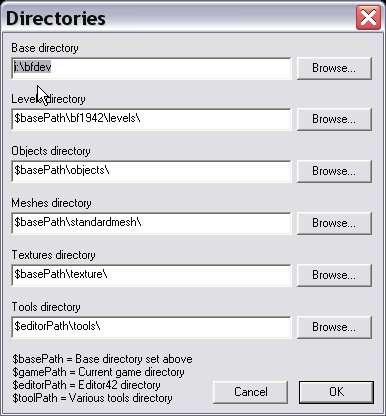
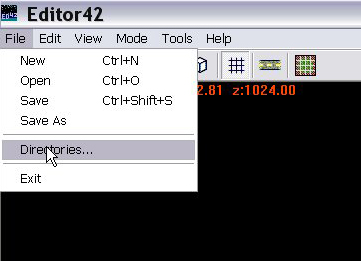
You can access the directories dialog box at any time by going to Files -> Directories like in the image below. This way you can quickly switch between the different mods you have dev folders setup for, and you can have as many as you want. Now as you get more and more dev folders it all doubles as a massive extracted mods and maps database, which can be quite handy when you think about it.
Now I am sure that by now you have Editro42 open, and by default the editor opens in a blank uncreated level in terrain mode. You can also set the editors init.con file to open on a specific map if you want to, more on that later. Now before we open a map, quickly look at the image below, because I need to point out a few control features you need to know right off for when we do open a map, and this will save you a bit of time on your learning curve, and also saving you from future problems. The only two you need to know for right now are marked in the image.
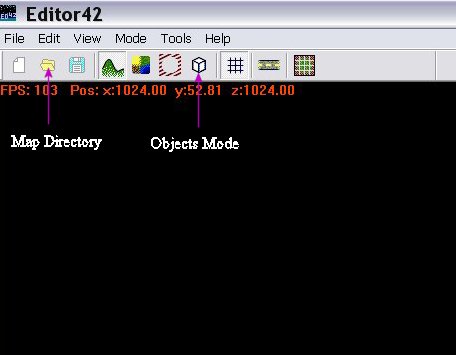
In the image above I have marked two icons - modes you need to know about in the next section.
Now lets open a map so click on the first image on the left to open the set up in a lightbox like above, and navigate through the steps with the "Next" and "Prev" links (or N - P keys) on the left and right sides. You close the lightbox with the close button (or X key)on the right side of the image description on the bottom. WARNING! When the map opens the first thing I want you to do is to click on the objects mode icon (F4), like I show in the above image, click the F key to do away with the fog, and hit the space bar to go into free camera mode. Now you can navigate with the familur W, A, S, and D keys. The reason for going into object mode is because, while simular, the controls for ED42 and BattleCraft differ in various ways, and in the other modes you well either paint something, or morf the trerrain the moment you go to until you get used to the differences between editors. One thing I can assure you, and that is that at some point you will understand why I am going to the trouble of telling you this the first time it happens. If it does just reopen the map without saving.


